Start Panel Problem !!!!


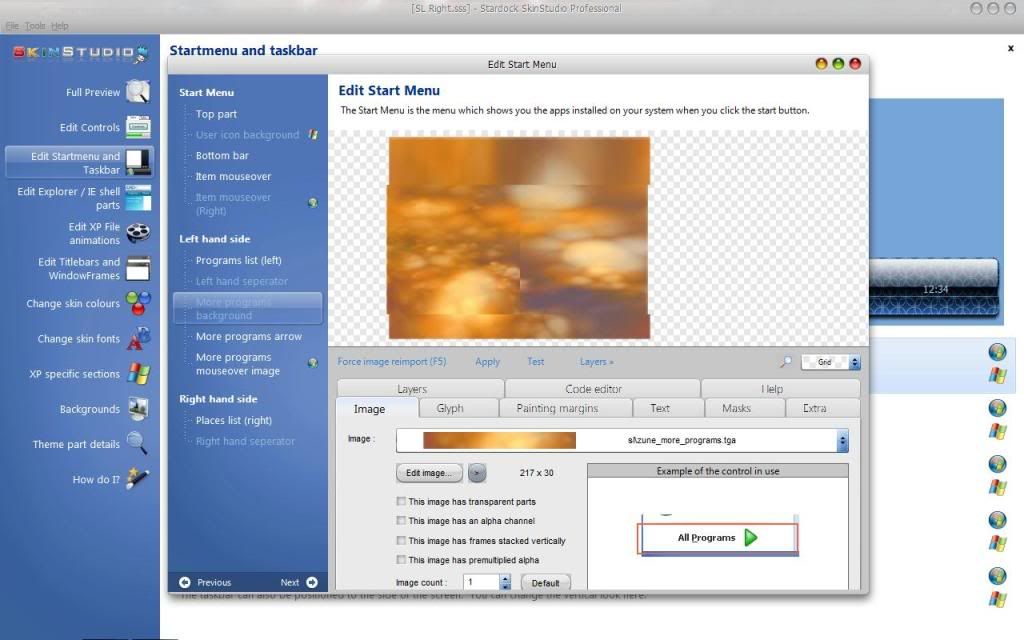
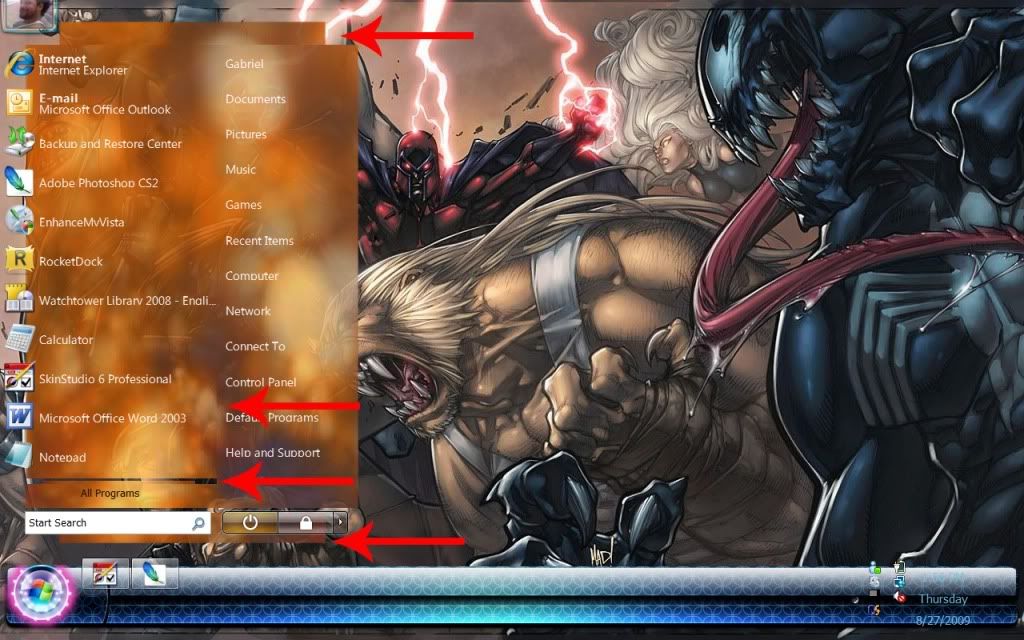
This is a simple Start Panel I created and sliced. But STILL Skinstudio 6.4 continues to give me problems when piecing the individual parts together. The Total height of the Start Panel is 411 pixels. The total length is 386 pixels. The dimensions of each piece: Top UserPane (386wide x 33high) Programs List (217wide x300high) Places List (169wide x 330high) More Programs (217wide x 30high) Bottom Bar (386wide x 48 high), Can someone PLEASE help me piece these damn things together? As it is, all the parts fit well. However, the Programs and Places List pieces sort of overlap. I can email you the Start Panel.psd file if you like.

13,118 views 25 replies
Reply #1 Top

Might there be left over code in the code editor from whatever template you're using?  You might have to play with your painting margins to get things to match up (I think...I'll let someone more knowledgeable post, but these were just the things off the top of my head from what little bit I've done so far).

Reply #2 Top

Slices seems to be in order but you will never get that to stretch looking good.

I think your problem is not the slices but width x height settings in your extra tab for all pieces.

Then you have to put margins 30px+10px bottom on placeslist and truesize on more programs 10px bottom programs list. To get them to stretch from the same place.

Bottom true size and Top true size, also leave a pixel or 2 from the left side of the start panel to the edge of the screen, there have been alignment issues, when animating, when not doing this before.


hope this helps if problem persists i can have a look at it.

Reply #3 Top

Delete all the code for all sections, start again, dont overlap your margins, if it was sliced right, it will piece together right. Also make sure the extra sections tabs have the correct part width's

Reply #4 Top

vStyler: How do I delete all the code? Can I simply set each part to "No Image", then re-import each pieces' image? And I didnt overlap any margins. But for some reason, there seems to be a slight overlapping where the Programs list meets with the Places List (they dont blend smoothly lthe way they should. About slicing. I found that Photoshop CS2 does a crappy job with slicing. When sectioning off the various start panel parts (with snap-to guides set) and selecting them with the rectangular marque tool, it sometimes causes each portion of the panel to have 1 pixel of another portion of the panel. This is quite frustrating and distorts the assembling of the entire final Start Panel.  


Voidcore: I'm finding your instructions hard to follow. Can you clarify?

Reply #5 Top

Voidcore: I would prefer not to stretch the Statr Panel, as I would like to keep the original details intact. I tried setting the H x W for each part to the h x w of each corresponding image's h x w. But still no luck. I'll try your suggestion of setting the margins on placeslist to 40px (from bottom), setting more programs to truesize, and setting programs list to 10px (from bottom) .

Reply #6 Top

(they dont blend smoothly lthe way they should. About slicing. I found that Photoshop CS2 does a crappy job with slicing. When sectioning off the various start panel parts (with snap-to guides set) and selecting them with the rectangular marque tool, it sometimes causes each portion of the panel to have 1 pixel of another portion of the panel. This is quite frustrating and distorts the assembling of the entire final Start Panel.

Use the slice tool, or are you doing that cant really figure it out. CS 1,2,3,4 havent failed me yet.

And unless that is the exact size of your start panel it will stretch.

Reply #7 Top

Quoting ortizlgnd, reply 4
How do I delete all the code?


Whatever was in there before will leave code in the "Code Editor" section of Skin Studio.  Before you import your graphics, go to the "Code Editor" section in Skin Studio 6 in the start menu section and delete everything that is in there; there will be a bunch of lines of text -- delete them out, and that will give you the fresh start that I believe you're looking for, and your graphics should import correctly.

Reply #8 Top

k10w3: Thanks for the info on how to clear the codes. I'll give it a try and post results. Thanks again.

Reply #9 Top

I use the slice tool to map out the various sections of the Start Panel. Once the slices are positioned where I want them, how do I cut each section and save it as it's own image?

Reply #10 Top

FILE-->SAVE for Web and Devices--> Select your slices -->press save--> in the combobox choose selected slices --->save...


Now you have all the slices in a subfolder named images per deafult at the location you saved.
done! :)

Reply #11 Top

Quoting k10w3, reply 7


Whatever was in there before will leave code in the "Code Editor" section of Skin Studio.  Before you import your graphics, go to the "Code Editor" section in Skin Studio 6 in the start menu section and delete everything that is in there; there will be a bunch of lines of text -- delete them out, and that will give you the fresh start that I believe you're looking for, and your graphics should import correctly.

I removed the code and re-imported each section of the Start Panel. Her are the results:

As you can see, the parts dont match up. This is without adjusting any of the margins however. Which margins would you suggest that I adjust and on which sides (top, left, right, bottom) should I adjust them from? Also, should I Tile those margins or not?BTW: I REALLY appreciate you assistance in walking me through this. :pout:


Reply #12 Top

First go to extra tab and insert every pics dimensions. Then do an APPLY se if it lines up. Then margins.
Top, bottom and moreprogs can have true size dont touch the margins.

Programs list put 10 in bottom margin, and lets say 40px top looks like a somewhat stretch friendly place.

Places list margins bottom is more progs height plus 10.... this is so it will stretch from the same place as programs list.

Report back when done :)

Reply #13 Top

Quoting voidcore, reply 12
First go to extra tab and insert every pics dimensions. Then do an APPLY se if it lines up. Then margins.
Top, bottom and moreprogs can have true size dont touch the margins.

Programs list put 10 in bottom margin, and lets say 40px top looks like a somewhat stretch friendly place.

Places list margins bottom is more progs height plus 10.... this is so it will stretch from the same place as programs list.

Report back when done

Dude, you're AWESOME! Problem solved. Thanks for the clear and simple walk-through.

Reply #14 Top

np, glad it worked out... now you only have 100-200 more pics to make for a whole blind.. ill see you soon :D

Reply #15 Top

100-200

or more XO

Reply #16 Top

Quoting voidcore, reply 14
np, glad it worked out... now you only have 100-200 more pics to make for a whole blind.. ill see you soon

lol. Thanks for the reminder ;P

Reply #17 Top

Quoting vStyler, reply 15

100-200


or more

BTW: thanks to you too for suggesting the clear coding method first. However, I really appreciate the simple step-by-step walk-thru that Voidcore provided me.  Thanks to you both.

Reply #18 Top

I hate to be a pain, but upon closer examination, I noticed a number of things:

 I initially didnt completely follow Voidcores instructions as I thought I did. I hadn't set the Top (UserPane), Bottom bar, and more Programs Margins to "Center Middle Section" and "Center (True Size, no margin)" I left them at "Stretch Middle Section" and "Paint Using Margins". I DID however, make sure to first, delete each sections codes, re-import each part, and enter each sections dimensions in the edit tabs. Then I set the Margins from the bottom of the Programs section to 10px and the places List margins from the bottom by 40px. Still it SEEMED as tho it fit nicely, that IS, until I examined the final result a bit closer. Here is what it looked like. I highlighted the area where (there was a light crease/overlapping between the More Programs section and the Places List.

Then, I started over making sure to follow Voidcores instructions Delete code, re-import parts, entered dimensions in Edit tab) and then setting the Top, Bottom, and More Programs sections to "Center Middle Section" and "Center (True size, no margins)". I then added the 10 px margins from bottom of Programs and 40px from bottom of Places List. The results were actually, even worse.  See below:

Please, I Know you guys are probably getting tired of me bugging you, but I'd REALLY appreciate it if you can help me once and for all, do this the right way.

Reply #19 Top

well if you want top send some me the whole startpanel image ill be glad to cut it up for you and put it into a wba for you but it would probably be better if you figured it out...make sure when you crop the image it is exactly to the slice marks...i used to have issues like that when i first touched a blind


if you want to send me the start panel image my email is   UNDERCOVERSKINNER@HOTMAIL.COM   i can do it right now if need be and ill send you back the wba file or the images cut up into png format for you ...whatever you choose

:thumbsup: :thumbsup:

Reply #20 Top

My latest skin has a fairly elaborate design in the start menu, though on the surface it may not seem so. It was pretty tricky getting the lines and shading to line up properly.

The advice I would offer would be too lengthy here. Try downloading the skin and examining it in SKS and see if it helps.

https://www.wincustomize.com/skins.aspx?skinid=6929&libid=1

Oh, and don't forget your context margins. Those will help your text to fit where it should. Context margins are found under the "Text" tab, toward the lower-right of the window.

Reply #21 Top

Here ive made a nice little picture tut.

First make sure your slices line up, when having done slices zoom in to check if they are pixel correct and not overlapping or have gaps, you can notice this when you export and have 6 images instead of the 5.


You dont have to copy my margins, they are correct for my graphics. Except the concept of the bottom margin and moreprog if you want an even stretch.

Reply #22 Top

Quoting voidcore, reply 21
Here ive made a nice little picture tut.

First make sure your slices line up, when having done slices zoom in to check if they are pixel correct and not overlapping or have gaps, you can notice this when you export and have 6 images instead of the 5.


You dont have to copy my margins, they are correct for my graphics. Except the concept of the bottom margin and moreprog if you want an even stretch.


Reduced 29%

Original 600 x 1500


Thanks again for taking all of this time assisting me. Question tho: After placing the slices where I want them to be, What do I do next? How do I export them? where do i export them to? I'm not familiar with how to correctly use the slice tool. And I haven't been able to locate any tutorials on using slices and saving each slice as it's own image. I'd really appreciate if you can assist me with this step aswell.

Reply #23 Top

Quoting Mirsguy, reply 20
My latest skin has a fairly elaborate design in the start menu, though on the surface it may not seem so. It was pretty tricky getting the lines and shading to line up properly.

The advice I would offer would be too lengthy here. Try downloading the skin and examining it in SKS and see if it helps.

https://www.wincustomize.com/skins.aspx?skinid=6929&libid=1

Oh, and don't forget your context margins. Those will help your text to fit where it should. Context margins are found under the "Text" tab, toward the lower-right of the window.

 Thanks, I'll check it out.

Reply #24 Top

Ill quote myself...

FILE-->SAVE for Web and Devices--> Select your slices -->press save--> in the combobox choose selected slices --->save...


Now you have all the slices in a subfolder named images per deafult at the location you saved.
done!

Reply #25 Top

I'm not familiar with how to correctly use the slice tool.

The slice tool can be pretty complex. I personally don't prefer it.

As an alternate,

1. Drag out guides to the positions where the start menu will need to be cut.

2. Make sure your start menu is merged together into one layer. Photoshop cs3 & 4 allow you to create a composite layer of all visible layers by pressing "alt+shift+ctrl+e."

3. Use your rectangular marquee tool to select the proper area for each piece.

4. Crop each individual piece, and save with an appropriate name, like "start menu top.png."